

I went to my second encaustic workshop today with Bridgette Guerzon Mills. It was awesome to get back into it again! It was actually a great way to jump start using my own supplies. I don't have the best set up right now because I have to use the encaustics in my kitchen. I really didn't take into consideration the fact that I would need access to 3 outlets. Anyways here are some photos from our day at Perfical Sense Studio!

Today Bridgette showed us how to do some different types of image transfer techniques. In these pictures we are doing some wet transfers by burnishing and then getting the paper wet and peeling it off. The toner from the paper literally transfers to the wax.

The transfers turned out beautifully! And I loved learning about the dry transfers too using graphite transfer paper or pastels. So perfect! Because now I can practically draw directly on the wax.

Here's my first wet transfer using a copy of one of my drawings.

Our encaustic class hard at work. And Bridgette encaustic artist extraordinaire on the right.

Huge thanks to Bridgette for once again inspiring us creatively! I didn't want to leave the studio so I went home and continued to work on my projects.
 |
| On the Mend |
This is the second project I made where I used both the wet and dry transfer techniques that Bridgette showed us. I knew I really wanted to do something with string in it so I made a drawing earlier in the week and photocopied it to use. Not exactly what I had in mind but not too bad. I think it's a theme I'll have to continue to persue in order to fine tune it.
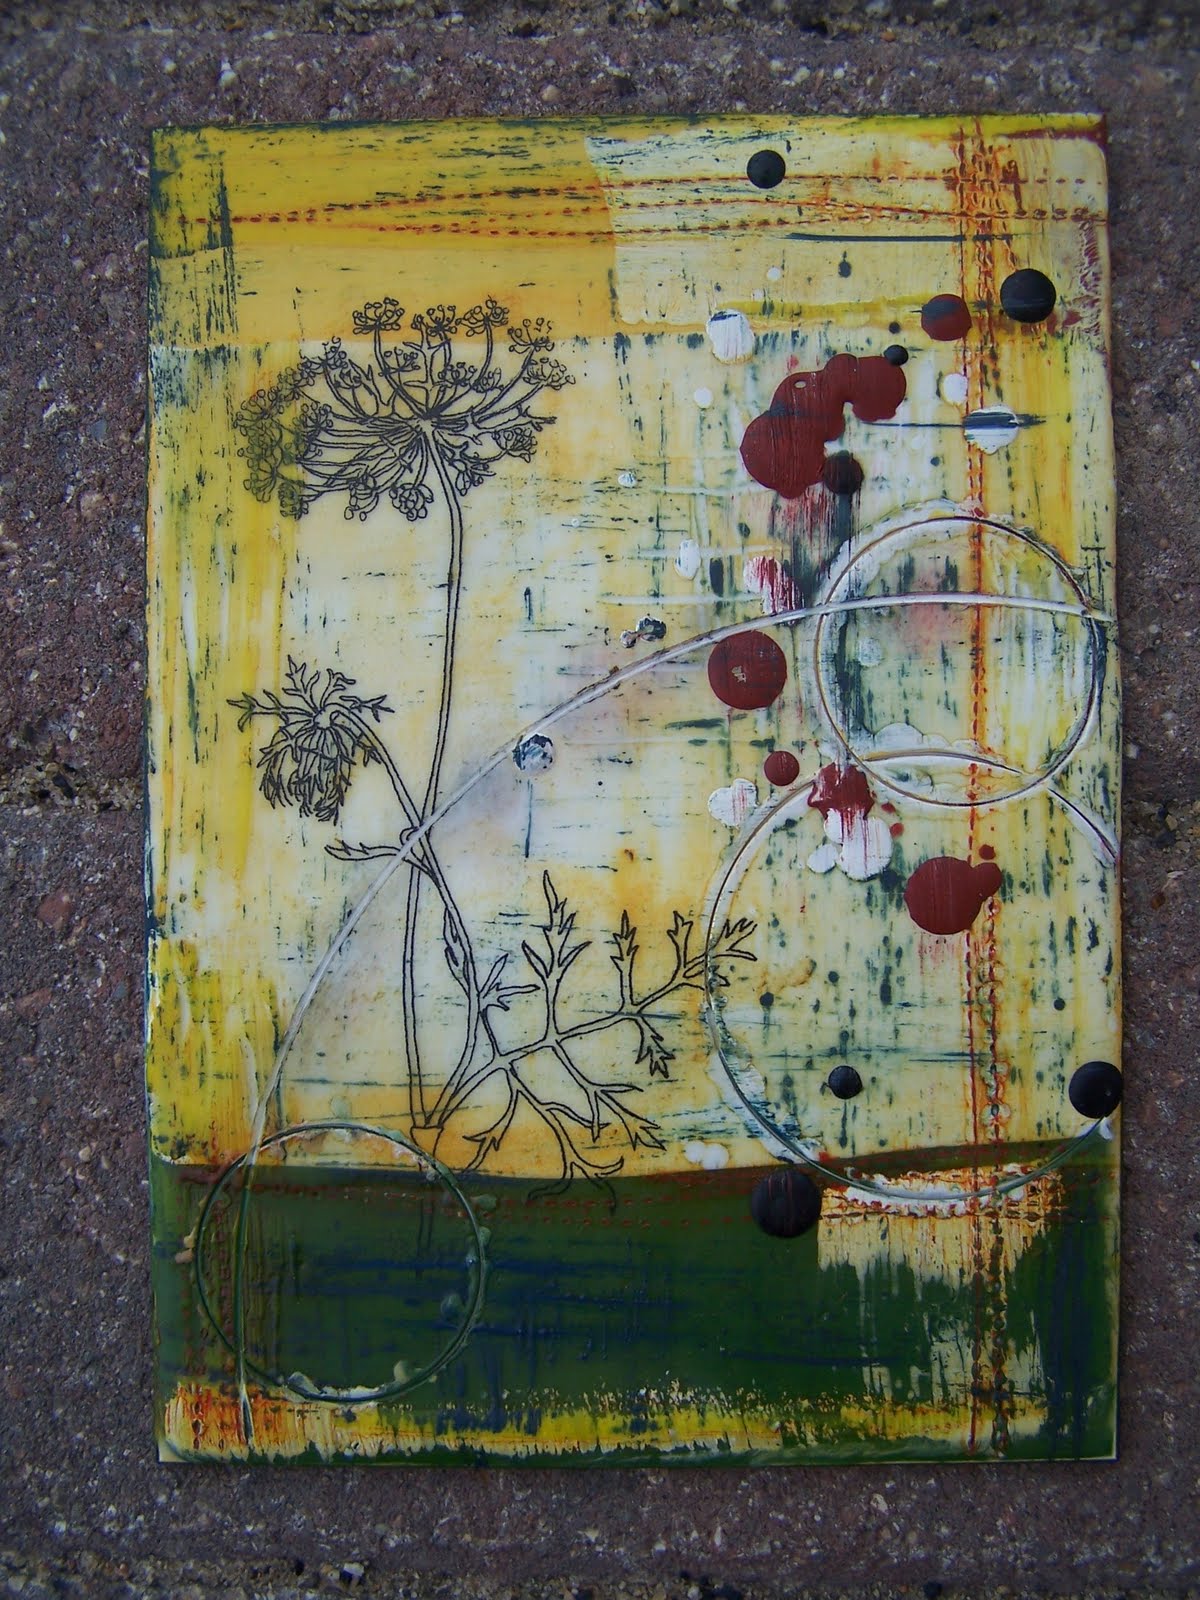
This is the first piece that was in the other picture. I can't think of a title for it yet....Queen Anne's Lace just seems way too obvious!

I took a couple of closeup shots because I really like the way the detail in the corner turned out. However the photo also shows the blobby mess in the middle of the hand. I really couldn't do too much to fix it without ruining the transfer though.

And here is a close up of the dry image transfer I made. Bridgette used the white transfer paper with one of her pieces and it looked like writing on a chalk board. What a great idea! So I had to try it out too.
***Now all I have to do is get that spare room cleared out to make a proper studio space.***
This is so fun to see! I love studios where everyone is creating so freely! Thank you for sharing!
ReplyDeleteThese look great! I love the needle and floss and the flower too!AriadnefromGreece!
ReplyDeleteHi Laura! Thanks so much for coming to workshop #2! I am so glad you were able to come and contribute your wonderful creative energy to the day. I love how you brought together the delicate lines of your drawings with encaustic. Wonderful effect!
ReplyDeleteI can't wait to see more of your encaustic work.
these are so exciting to see let alone to watch the process and how you grow with it!
ReplyDeletethanks for sharing
I really do enjoy it! Thanks for the kind comments everyone!
ReplyDeleteLAURA THIS IS SO AMAZING! Your art is incredible! I cannot tell you how much I wish you lived down the road right now, because I would totally invite myself over for some tips! Can you PLEASE tell me how to do the wet transfer? I'm dying to know because I've had an art idea for ages that I cannot make because I don't know how to transfer my image. Your drawings are so wonderful too! I hope you are feeling very clever and proud. You should be! So, so beautiful x
ReplyDeleteKerri if my husband ever travels to NZ again for business I am tagging along so I can visit you!
ReplyDeleteMaking transfers with wax is sooo easy. Be sure your image is photocopied or printed on a printer that uses toner. Most laser printers use toner...ink jet prints are water soluble so they don't work very well.
Just place the image face down on slightly warmed wax and burnish the back side with a spoon or similar smooth object. Burnish really well then spray the paper with water (maybe even burnish some more) then rub the paper with your finger until it starts to roll off. The toner will have "transfered" to the wax and the rest of the paper you should just keep rubbing off.
If you are not using wax I have just painted a stiff board with matte medium and burnished my image onto that instead (even magazine pictures work well for practice). Wait for it to dry thoroughly though before you spray and peel off the paper. Oh and remember the image will be reversed. Let me know if you try it out!
Yay! Thank you! I'm very excited! Thanks so much for these tips. I am planning on doing my transfer onto board using mod podge so I think it should work well. For some reason I thought that laser printers didn't use toner, so I've been wondering how to find a printer that did. I do have access to a laser printer though, so that's brilliant! Did you let the matte medium dry before you started to burnish your image? And yes you must come to NZ if your husband comes again! Thanks so much Laura!
ReplyDeleteOh p.s are you planning on showing us your transfer on the stiff board? I'd love to see it!
You want to do the burnishing before the medium dries to make sure the image really sticks. But you definitely want it dry before you wet the paper and roll it off.
ReplyDeleteAnd I do these kind of transfers with my students projects so I really don't have anything to show. I have found that they don't always turn out as clear as the ones I did on the wax. So expect something more rough and distressed looking.
No worries! Thanks for that Laura :)
ReplyDelete